|
 |
|||||||||||||||||
|
|
|
|
|||||||||||||||||
|
|
Switch Plate Covering
Printer Friendly Version
This page covers the guidelines for covering switch plates. The materials and techniques discussed work on most types of switch plates. Certain switch plates require specialized techniques and may require the services of a wallcovering specialist.
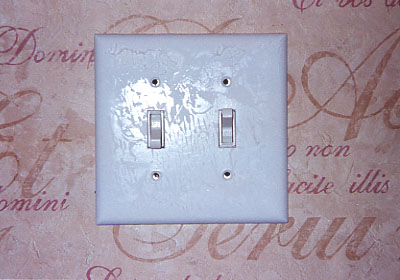
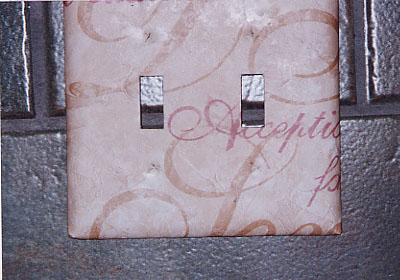
This is the starting point of a typical switch plate cover. In this case, it is the light/fan control in a bathroom. |
|
|
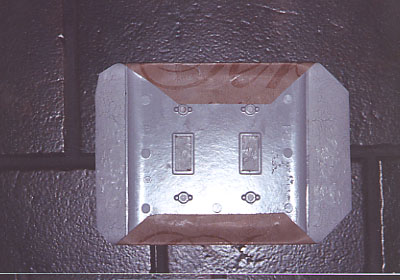
1. Here is the switch plate over the bare outlet. Your first step is
to find a scrap piece of wallpaper that will match the existing pattern.
Some wallpapers do not have a match, in that case, any piece will do. |
 |
|
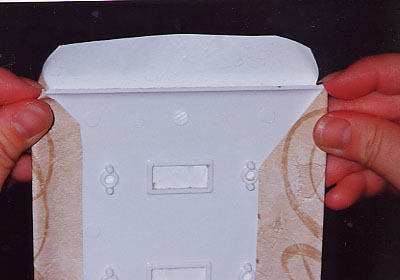
2. You will then rough cut the scrap piece and match it up to the
switch plate cover. You will want a piece that is roughly 2 inches bigger
than the switch plate. Apply wallpaper paste to the scrap piece and let it
rest the same amount of time the original wallpaper did. This will ensure
that the scrap contracts/expands the same as the original paper, ensuring the
pattern will match as close as possible. Position it over the switch plate.
Carefully match the wallpaper pattern at the top and left of the switch plate. You
will then press flat the top and left portions (protrusion of the light
switches prevent matching of more than two sides). Reach behind the wallpaper and
carefully remove the switch plate and wallpaper together. Wipe down the
area to remove any paste left on the wall. Some professionals use 3M
77
spray adhesive instead of wallpaper paste. |
 |
| 3. Place the wallpaper/faceplate face down. Trim the wallpaper with scissors 1 to 1 and 1/2 inches past the size of the switch plate. Then, make diagonal cuts on the corners. The area between the corner of the switch plate and the edge of the wallpaper should be about 1/8". |
|
| 4. Fold over the top and bottom edges. |
 |
| 5. Pinch the corners of the switch plate as you fold over the left and right edges. This will create a sharp, hospital corner edge. |
 |
|
6. At this point, take it back to the
switch, line it up, verify your alignment, and make adjustments if necessary.
Some professionals take the additional precaution of taping the flaps to the
back of the switch plate cover as well. |
|
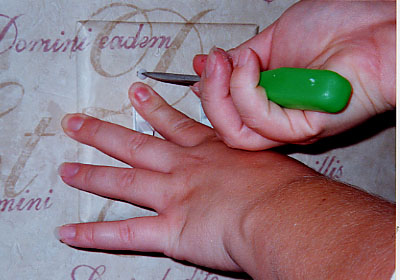
| 7. Cut the opening out with a quality razor knife. Back the switch plate up on firm surface while cutting, otherwise, you will tear the wallpaper as opposed to cutting it. A spare piece of ceramic tile works great for this. Some professionals cut the long sides of the opening and then cut horizontally across the gap. This creates an "H" cut. The two flaps are then folded into the backside of the switch plate. |
 |
| 8. Cut a small "X" into each screw hole of the switch plate. |
 |
|
9. During installation, apply pressure near the screw hole while putting in the screw. Once you get close to where you think it will stop, proceed carefully. Once the screw wants to stop, do not continue or the screw head will tear the paper in the vicinity of the screw hole. Applying pressure allows you to flex in the switch plate so that you can stop near the stop point. When you release pressure, the switch plate will flex out and grab the screw. |
 |
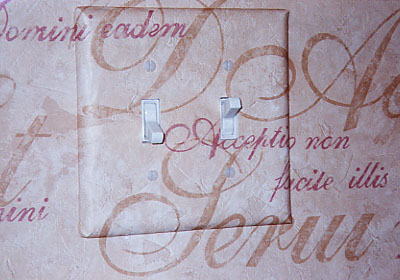
| 10. For a more professional appearance, align the screws heads vertically. Some professionals take the additional step of painting the screws to make them disappear. Another method is to cut a vertical slit 1/2" over the screw holes in the switch plate. This allows you to drive in the screw and once you are near the paper surface, tuck the screw behind the wallpaper via the slit. Once the screw is fully in, you remove the screwdriver and smooth over the slit area. Now your screws are hidden behind the wallpaper. |
 |